10DLC stands for “10-digit long code” and allows businesses to send Application-to-Person messages using standard, local 10-digit phone numbers as Sender IDs. Carriers in the US consider all messages (i.e., SMS and MMS) that are sent using a messaging provider like Wavix to be Application-to-Person traffic.
For the purpose of this guide, we will use the following Wavix gateways:
- Register your Brand
- Register your Campaign and outbound numbers (aka 10DLCs or Sender IDs)
The Campaign Registry (TCR) is the central hub for registering Application-to-Person messaging Campaigns in North America.
Note
You must register a Brand and a Campaign if you’re using 10-digit local phone numbers as Sender IDs. This requirement does not apply in case you are using toll-free numbers or short codes.
Keep in mind that:
- Each Brand registration must be pre-approved by mobile carriers
- Actual message throughput is determined by carriers after the registration is approved and depends on the provided Brand details and actual message content
The Wavix platform allows its customers to register 10DLC Brands and Campaigns directly from the user interface.
Important
The information you provide during the registration process might affect message throughput. Please ensure you provide up-to-date and accurate details.
Depending on the legal status of your business, you can choose either Quick or Standard Brand registration.
Quick registration is restricted to sole proprietors without an EIN or Tax ID and requires fewer Brand details to be provided during the registration process. Brands selecting the Quick registration are limited to a single 10DLC phone number and have low messaging throughput.
Standard registration requires detailed company information and offers higher throughput. Brands can have up to fifty 10DLC Campaigns, with up to forty-five 10DLC phone numbers per Campaign.
Note
Mobile carriers automatically allocate message throughput based on the submitted Brand details and message content.
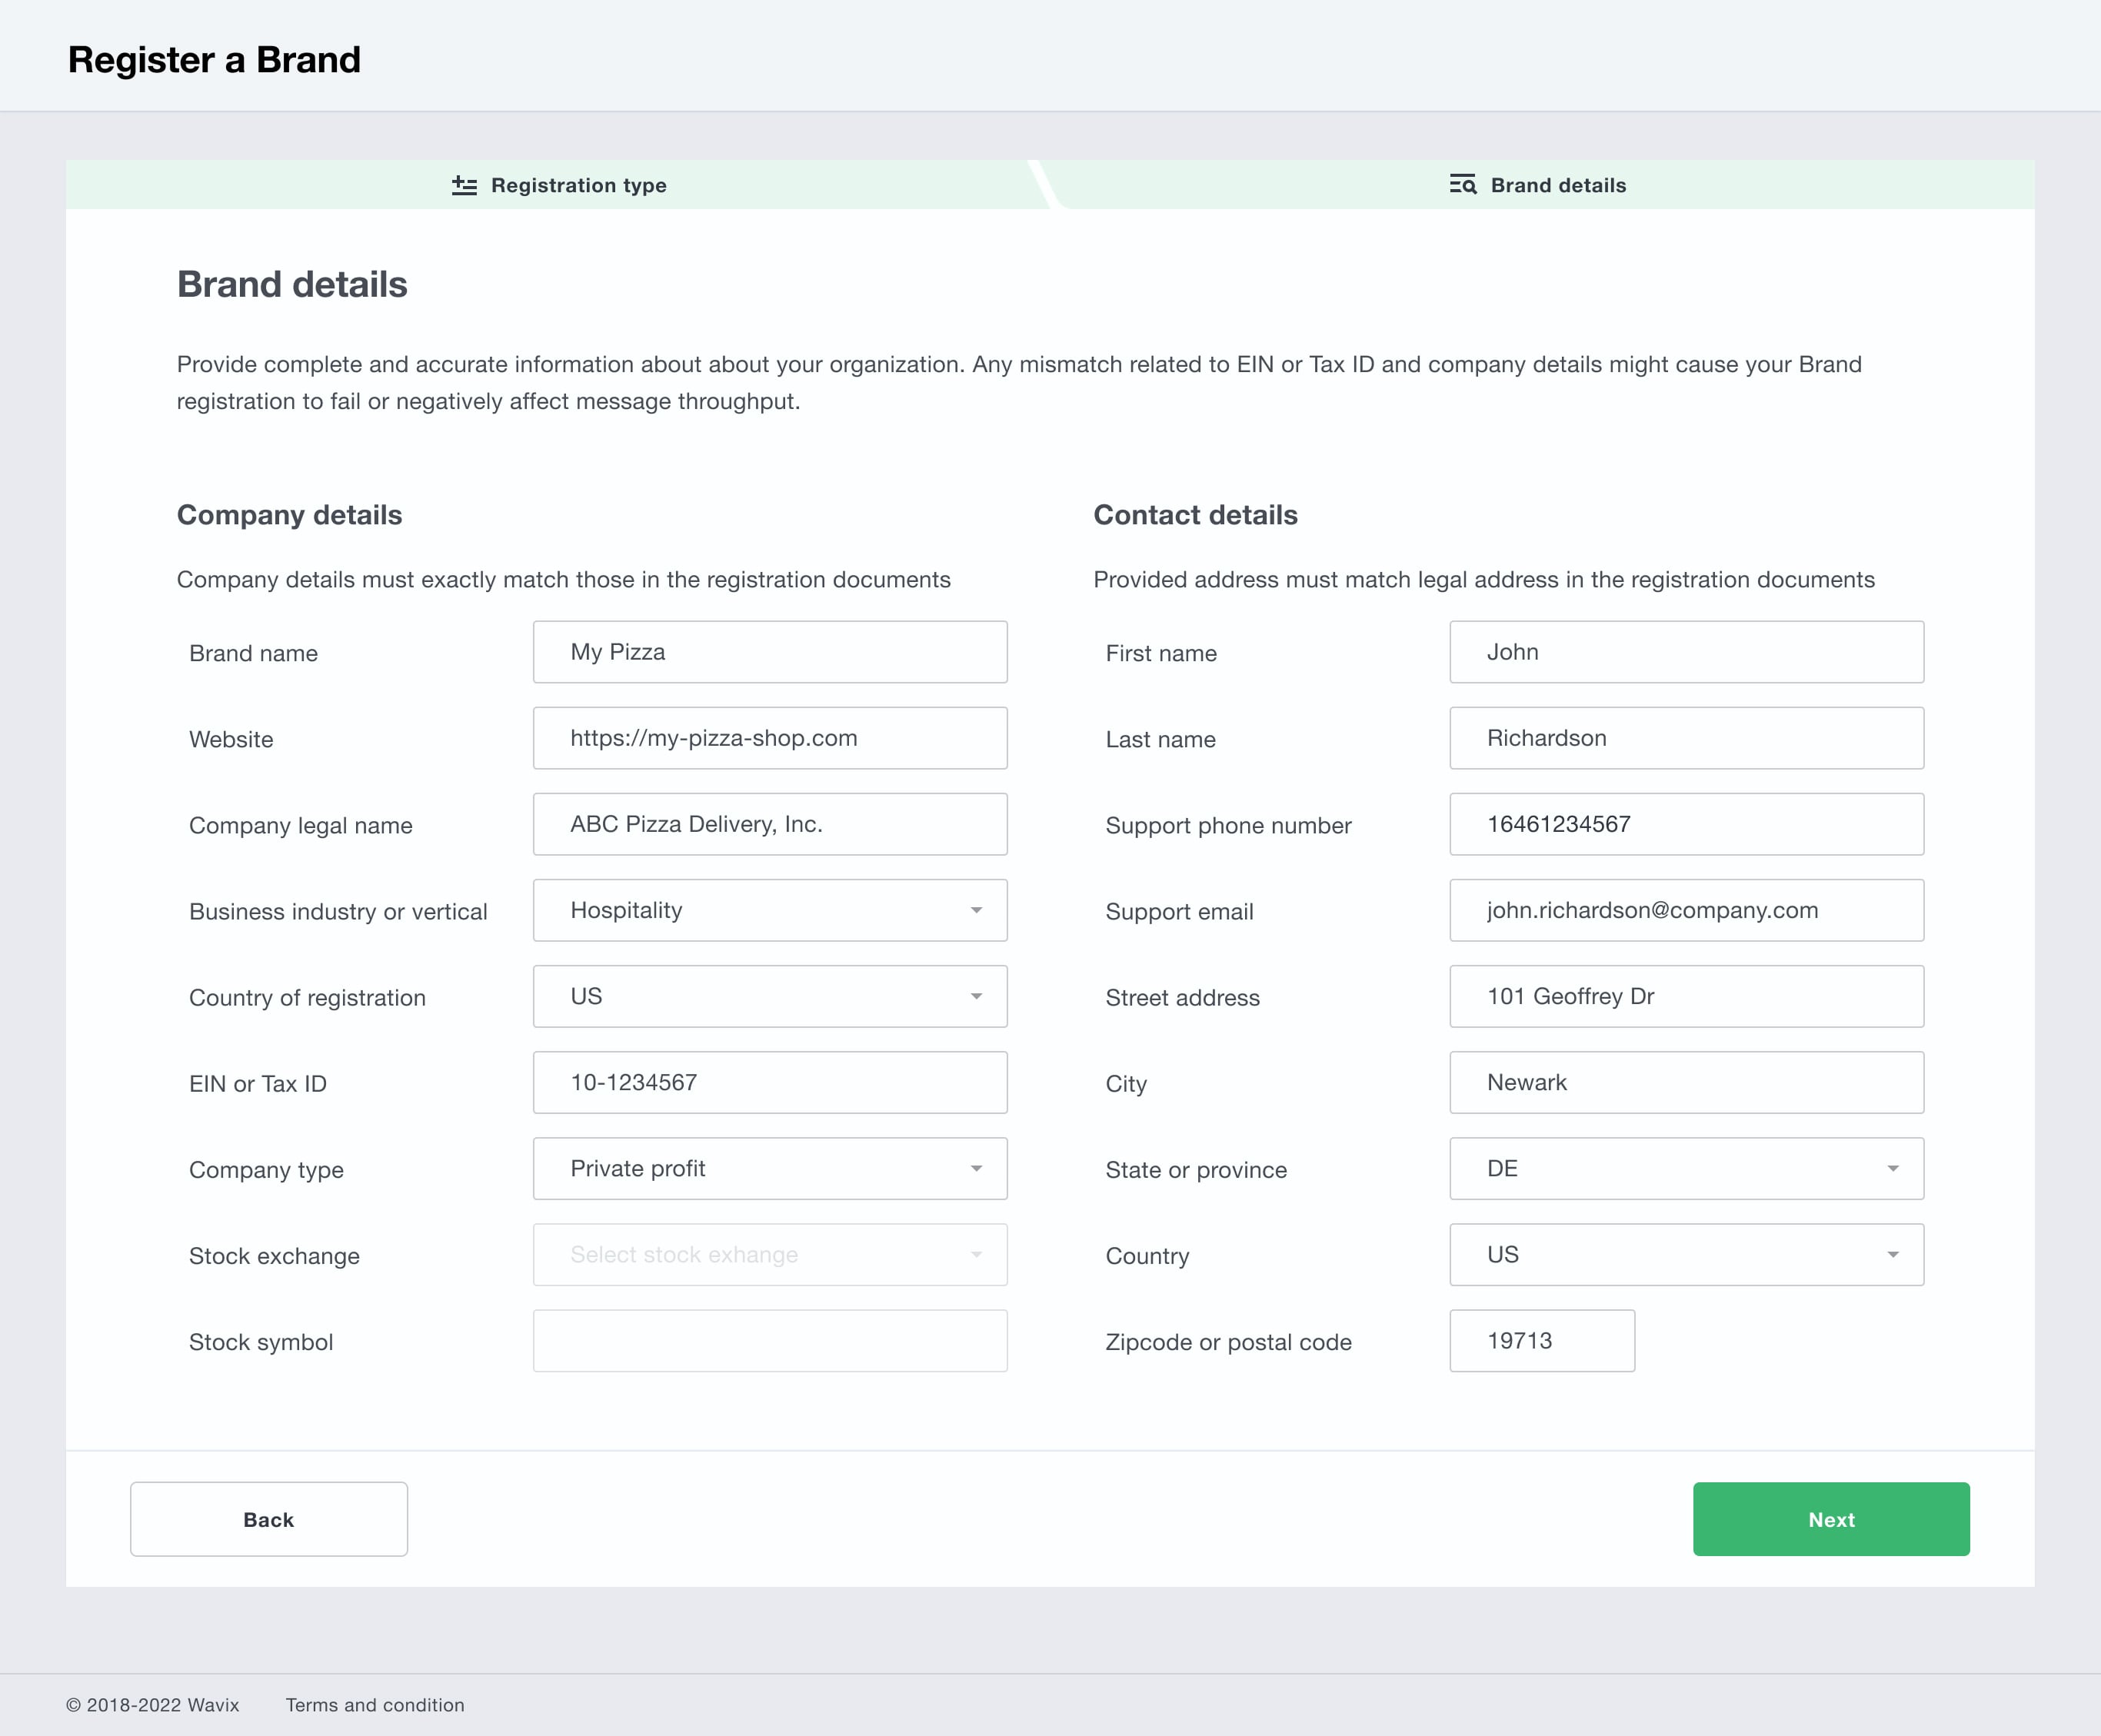
To register a Brand you need to provide complete, accurate, and up-to-date information about your organization, including:
- Brand name or DBA name
- The website address, optional for Quick Brand registration
- Company legal name
- Industry or vertical the business operates in
- Country of registration
- EIN for US companies and Tax ID for companies incorporated in other countries, if applicable
- Company type, if applicable
- Stock exchange, for publicly traded companies only
- Stock symbol, for publicly traded companies only
- Contact details
- Company support email address and phone number
- The company’s business address must exactly match the legal address in the registration documents
If you’ve chosen Quick registration, you have to provide the contact details of the business owner. For Standard registration, contact details must contain the first and last name of the person filing the Brand registration request.

Fig. 1 Brand registration
After providing the information, click Next to view the Brand registration summary page and check the provided details. If you need to update any of the fields, click Back to go to the previous step.
If the information is correct, confirm a non-refundable Brand registration fee and click Submit.
The Brand registration status is based on the accuracy of the submitted information. The Campaign Registry (TCR) Administrator will locate and confirm the existence of the Company you submitted by checking against several databases and utilizing verification software. Correct legal company name and address, EIN or Tax ID are extremely important for obtaining a ‘Verified’ status.
If your Brand can not be verified, you can resubmit the form after updating the Brand details.
Wavix provides feedback to help you identify possible data inaccuracies.
Before registering a 10DLC Campaign, you need to have an active US local phone number on your account.
Each 10DLC Campaign should describe your specific use case, and the content of SMS and MMS actually sent.
To register a new 10DLC Campaign, you need to provide the following information:
- A campaign name that will be used for reference purposes
- A detailed Campaign description
- Use case that describes your messaging scenario
- Exact examples of messages that will be sent
Important
The Campaign description, Use case, and message samples need to be as exact as possible. Mobile carriers may check them to confirm if the provided details actually apply to the content of messages being sent.

Fig. 2 Campaign details and use case
Depending on the selected Use case, you would need to provide up to five message examples. We recommend you provide exact samples without using placeholders or variables in the message body.

Fig. 3 Message samples
Select all the Campaign attributes that apply to your Campaign and message content using the YES/NO toggle.
Click Next to specify additional details of your Campaign.
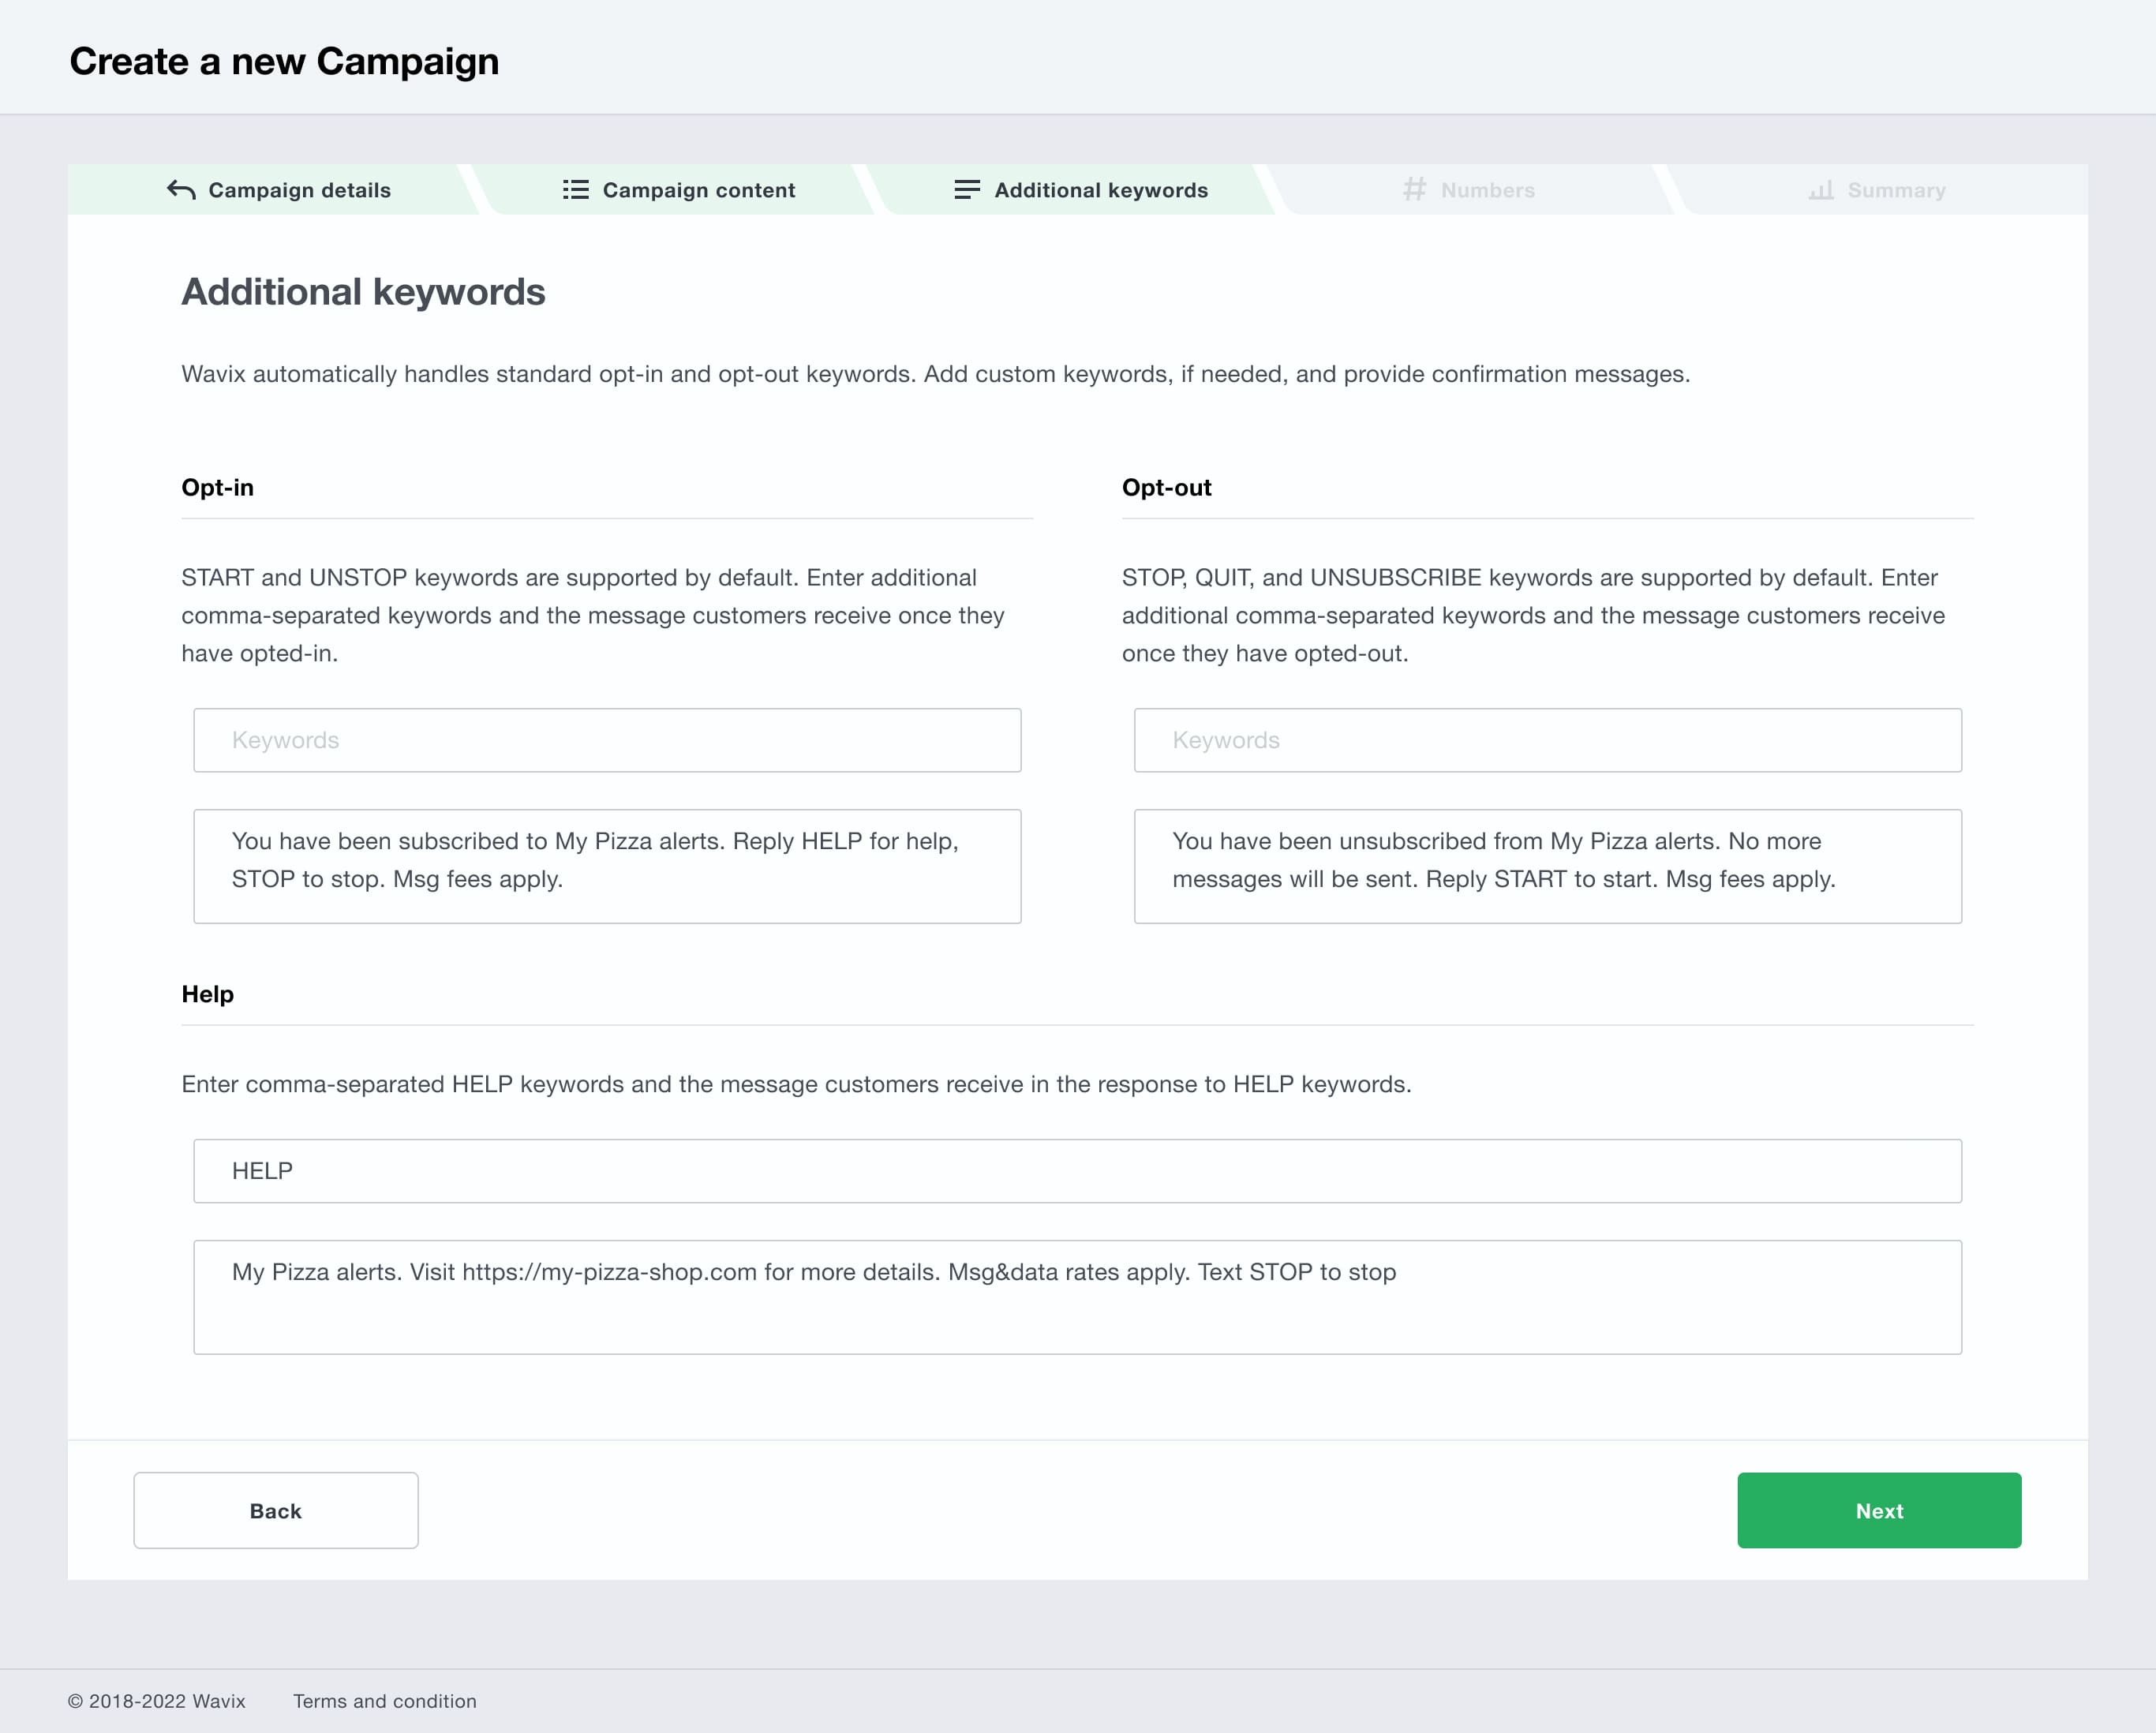
Wavix supports all standard opt-in and opt-out keywords by default. Please note that all additional keywords are case-insensitive.
Handling STOP keywords
Add custom, comma-separated opt-out keywords if needed. US mobile carriers require you to provide a response (aka acknowledgment) when a person sends any STOP keyword. Enter the acknowledgement message your customers will receive if they opted out.
Handling START keywords
Add custom, comma-separated opt-in keywords if needed. US mobile carriers require you to provide a response when a person sends any START keyword. Enter the acknowledgement message your customers will receive if they opted in.
Handling HELP keywords
Your customers might reply with the word "HELP" or any custom HELP keyword to learn more about the messages that they're receiving from you. List all comma-separated HELP keywords and specify the message to be sent back when any of the HELP keywords are received.

Fig. 4 Additional opt-in, opt-out, and help keywords
You can add up to five phone numbers to your Campaign, depending on the registration process selected. Choose the numbers you want to use as Sender IDs and click Next.

Fig. 5 10DLCs for the Campaign
Important
Each phone number can be assigned to a single Campaign only. If the phone number is grayed out, you need to unassign it from the Campaign it is currently linked to.
Review your Campaign details. In case of any errors click Back and update the necessary fields. Click Register to complete the wizard.

Fig. 6 Campaign summary
Note
Campaign registration and monthly fees for the first three months will be deducted from your account automatically.
Standard Use case Campaigns are automatically approved and become Active. Special Use case Campaigns may require additional approval by mobile carriers before activation. Once the Campaign is Active, you can start messaging.
Create a more engaging and impactful communication experience with Wavix. Make calls, send texts, and create tailored solutions to wow your customers.