Getting Started
Wavix allows developers to leverage feature-rich APIs to incorporate voice and text messaging interactions. Integrate APIs with your application to send voice and text messages and receive detailed reports programmatically.
Use familiar languages to easily integrate communication features and enable your applications to send and receive messages anywhere in the world.
API key management
Wavix uses API keys to authenticate requests to the Wavix APIs. The API key must be passed as the appid parameter in the query string with every API call.
An example of an API request is provided below
POST https://api.wavix.com/v2/messages?appid=<YOUR_API_KEY>Wavix supports multiple API keys per account, which means you can use different keys to access various services or use one API key for the test environment and another one for production. By default, a single API key is generated for every Wavix account upon registration on the platform.
This guide explains how to create, manage, and delete API keys on your Wavix account.
Creating an API key
To create a new API key, follow the steps below:
- Log in to your Wavix account at https://app.wavix.com
- Click on the ‘Profile’ icon in the top right corner
- Select ‘API keys’ in the menu
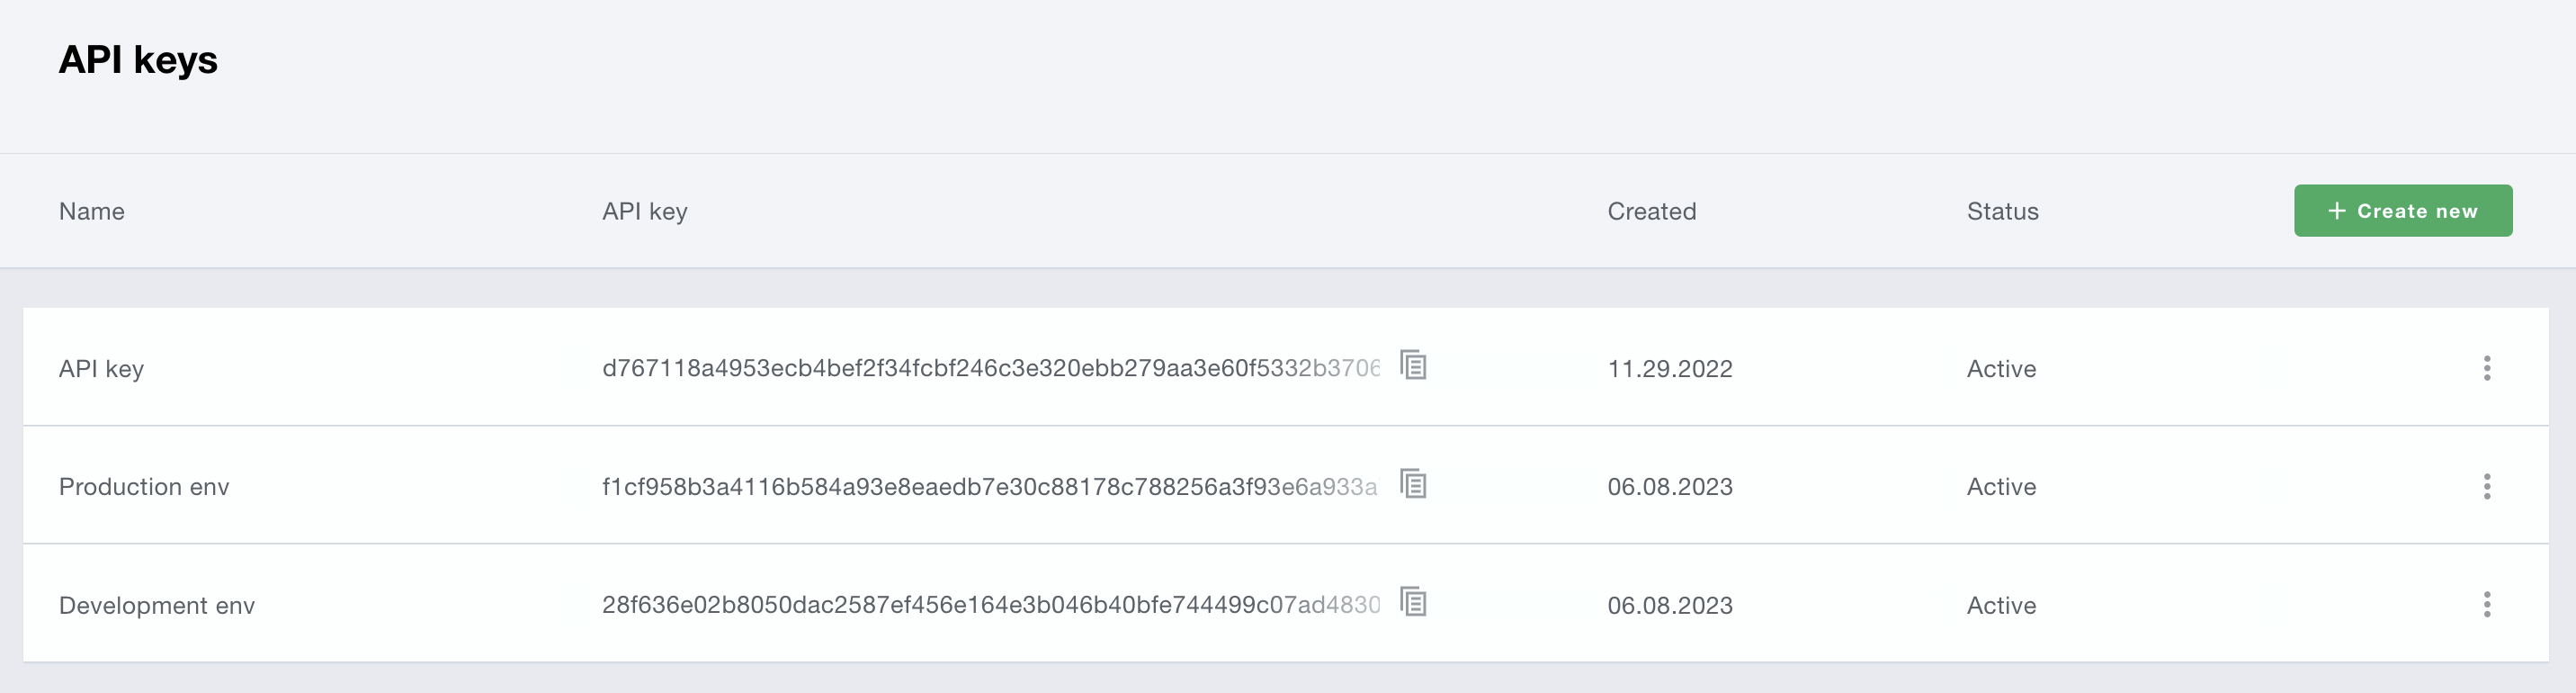
You will be directed to a page with a list of API keys associated with your account. To create a new API key
- Click on the ‘Create new’ button
- Enter a user-friendly name for the API key
- Optionally, enable IP restrictions for the API key
- Click Create to create the API key
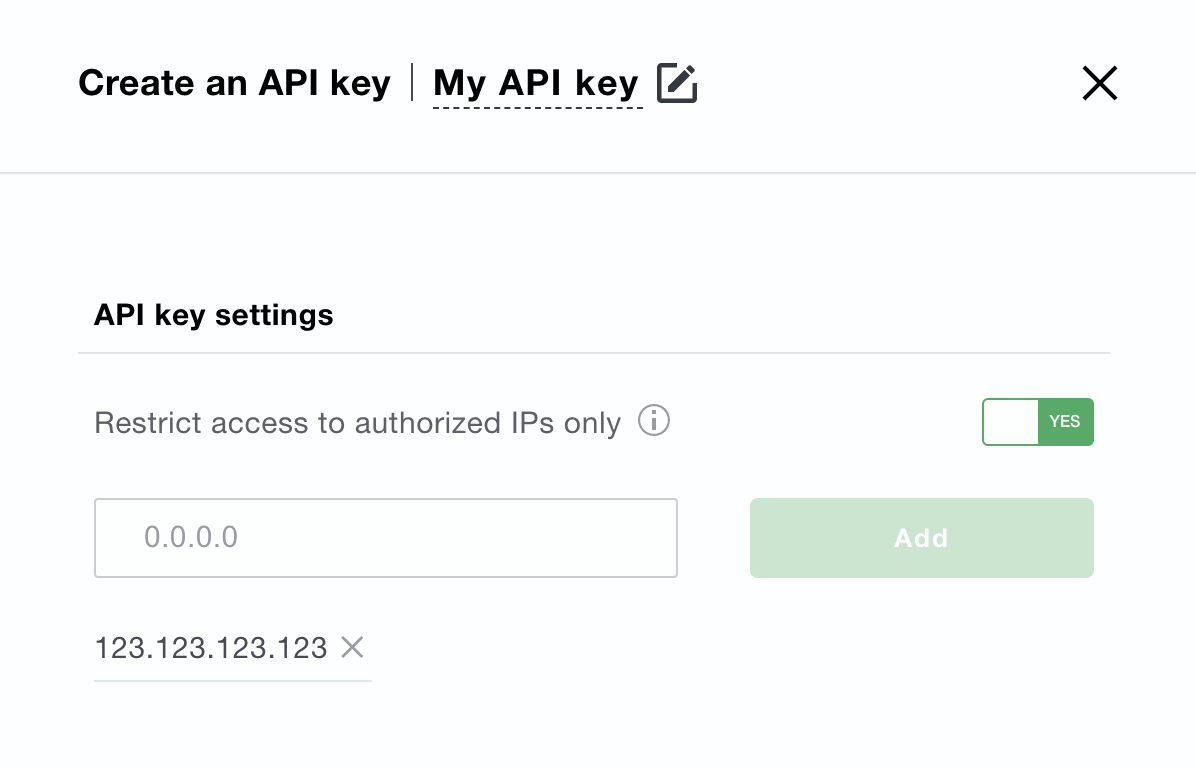
NOTE IP restrictions limit the API key usage to allow-listed dedicated IP addresses only. API requests sent from IP addresses that are not on the list will result in the 401 Unauthorized response.
Editing an API key
To edit an API key, click on the three dots icon located on the right-hand side of the API key and select "Edit." You can modify the key's name, activate IP restrictions and edit the list of allow-listed IP addresses.
To disable an API key, click on the three dots icon located on the right side of the API key and select "Disable." To re-enable a previously disabled API key, click on the three dots icon and select "Enable."
NOTE Disabled API keys cannot be used to access the Wavix APIs. When an API key is disabled, all services using the key will no longer have access to the Wavix APIs.
Deleting an API key
To delete an API key, click on the three dots icon located on the right side of the API key and select ‘Delete’.
NOTE Deleting an API key is an irreversible action. Once the API key is deleted, all services using the key will permanently lose access to the Wavix APIs.
DID numbers
The Wavix platform provides access to a global inventory of local, mobile, national, and toll-free numbers in over 140 countries.
In this section you will learn how to search DID numbers, purchase DID numbers, configure DID numbers on your account, and release purchased DID numbers using the Wavix API.
NOTE The Wavix DID Numbers API is only available exclusively for Flex Pro users.
Prerequisites
Before you can search for and buy your first DID number, you need to sign up for a Wavix account.
Follow these steps to successfully create a new Wavix account:
- Register your email address at https://wavix.com.
- Check your inbox for an activation email from Wavix.
- Click on the link in the email to activate your account.
After a Wavix sales representative approves your account, you’ll need to choose the Wavix Flex Pro account level and you’ll be granted access to the Wavix DID numbers API.
The Wavix APIs use API keys for request authentication. To get your API key, log into your Wavix and click on the Profile icon in the top right corner. The API keys can be found in the “API keys” section.
More information on how to authenticate API requests can be found at https://wavix.com/api#/rest/getting-started/authorizing-your-client
Searching, buying, and configuring DID numbers
Search DIDs
You need to purchase a DID number from the Wavix global inventory to receive calls from your customers.
To search for a DID number follow these steps:
- Get a list of countries with DIDs available. You can search for geo, toll-free, or both types of phone numbers. Filtering by SMS-enabled numbers is also available.
Request example
GET https://api.wavix.com/v1/buy/countries?type_filter=all&text_enabled_only=false&appid=<YOUR_API_KEY>Response example
{
  "countries": [
   {
      "id": 8652,
      "name": "United States",
      "short_name": "US",
      "has_provinces_or_states": true
    }
  ]
}- If the country you are interested to search DID numbers in has provinces or states, {has_provinces_or_states} attribute in the response will be set to true, otherwise false. For countries with provinces or states, you need to get a list of provinces or states first.
Request example
GET https://api.wavix.com/v1/buy/countries/8652/regions?type_filter=geo&text_enabled_only=true&appid=<YOUR_API_KEY>Response example
{
  "regions": [
    {
      "id": 379,
      "name": "New York"
    }
  ]
}- Get a list of regions and cities in the selected country. Use {country_id} and {region_id} from the responses above.
Request example
GET https://api.wavix.com/v1/buy/countries/8652/regions/379/cities?appid=<YOUR_API_KEY> Response example
{
  "cities": [
    {
      "id": 200,
      "name": "LOS ANGELES, CA",
      "area_code": 213568
    }
  ]
}
NOTE For USA area_code returned in the response is in NPA-NXX format.
- Get a list of phone numbers in the selected city. Use the IDs of the selected country and city from the responses above instead of {country_id} and {city_id} respectively.
Request example
GET https://api.wavix.com/v1/buy/countries/8652/city/200/dids?type_filter=all&text_enabled_only=true&appid=<YOUR_API_KEY> The response will contain DID numbers and their details, such as ID, status, activation, monthly fees, and the number of inbound channels.
Buy DIDs
To purchase DID numbers follow these steps:
- Add selected DID numbers to your cart.
The request body contains an array of IDs of DID numbers you want to purchase
Request example
PUT  https://api.wavix.com/v1/buy/cart?appid=<YOUR_API_KEY>
-H  "Content-Type: application/x-www-form-urlencoded" -d "ids=1,2,3,4"
The response will contain DID numbers successfully added to the cart and their details, such as status, activation, and monthly fees, and the number of inbound channels for the number.
- Check out numbers from the cart.
After DID numbers are added to the cart check them out to finalize the purchase. The method does not take any attributes.
Request example
POST https://api.wavix.com/v1/buy/cart/checkout?appid=<YOUR_API_KEY>NOTE Activation fee and monthly fee will be automatically deducted from your balance. Make sure you have enough funds on your account or a primary card linked to your account with sufficient funds.
List purchased DIDs
To get a list of purchased DIDs on your Wavix account, use the following method:
Request example
GET https:/api.wavix.com/v1/mydids The response will contain DID numbers and their details, such as status, activation, monthly fees, and the number of inbound channels.
A DID number status can be one of the following:
- Active - the number is fully configured and can receive inbound calls.
- Inactive - some additional documents are required to activate the number. For inactive DID numbers, the response will contain a description of documents required to activate the number.
Update DID destination
Inbound calls to active DID numbers can be forwarded to:
- SIP trunk
- SIP URI
- Dedicated PSTN number To update the destination, use the below API method. Destinations for several DIDs can be updated with a single request.
Paste the following JSON in the request body
{
    "ids": [
        1,
        2
    ],
    "destinations": [
        {
            "transport": 1,
            "destination": "sip@example.com",
            "priority": 1,
            "callhunt": false,
            "active": true
        }
    ]
}
Return DID number
The DID numbers that are not used anymore can be returned to the Wavix global inventory.
Using the method you can return several unused DIDs with a single request.
SIP trunks
Session Initiation Protocol (SIP) is a signaling protocol for initiating, terminating, and modifying user sessions over an IP network. The Wavix platform provides scalable, enterprise-level functionality that supports both inbound and outbound calls. In this section, you will learn how to create and configure SIP trunks on your Wavix account using the Wavix API.
NOTE The Wavix SIP trunks API is only available exclusively for Flex Pro users.
Prerequisites
Before creating your first SIP trunk, you must sign up for a Wavix account.
Follow these steps to successfully create a new Wavix account:
- Register your email address at https://app.wavix.com/.
- Check your inbox for an activation email from Wavix.
- Click on the link in the email to activate your account.
After a Wavix sales representative approves your account, you’ll need to choose the Wavix Flex Pro account level and you’ll be granted access to the Wavix SIP trunks API.
The Wavix APIs use API keys for request authentication. To get your API key, log into your Wavix and click on the Profile icon in the top right corner. The API keys can be found in the “API keys” section.
More information on how to authenticate API requests can be found at https://wavix.com/api#/rest/getting-started/authorizing-your-client
List SIP trunks on your Wavix account
To get the list of SIP trunks and their statuses on your Wavix account, use the following method:
Request example
GET https://api.wavix.com/v1/trunks?appid=<YOUR_API_KEY>Create and configure SIP trunks
The Wavix platform supports the following authentication methods for SIP trunks:
- Digest - your SIP devices can authenticate based on their log-in and password.
- IP Authentication - the SIP trunk will authenticate SIP INVITE messages sent from specified IP addresses. IP Authentication is a subject for manual approval by Wavix administrators.
For outbound calls, Wavix supports one Caller ID per SIP trunk by default. To use more than one Caller ID, the SIP trunk needs to have Caller ID Passthrough enabled. Caller ID Passthrough feature activation is a subject for manual approval by Wavix administrators.
To create a SIP trunk on your account, use the following API method:
Paste the following JSON in the request body
{
    "label ": "SIP trunk label",
    "password": "YOUR_SIP_TRUNK_PASSWORD",
    "callerid": "12121234567",
    "ip_restrict": true,
    "didinfo_enabled": true,
    "call_restrict": true,
    "call_limit": 60,
    "cost_limit": true,
    "max_call_cost": 0.18,
    "channels_restrict": true,
    "max_channels": 10,
    "rewrite_enabled": true,
    "rewrite_prefix": "00",
    "rewrite_cond": "1",
    "passthrough": false
}
After the SIP trunk is successfully created, you will receive a response with SIP trunk ID and its configuration parameters.
To update the SIP trunk configuration, use the following API method:
Paste the following JSON in the request body
{
    "label ": "SIP trunk label",
    "password": "YOUR_SIP_TRUNK_PASSWORD",
    "callerid": "12121234567",
    "ip_restrict": true,
    "didinfo_enabled": true,
    "call_restrict": true,
    "call_limit": 60,
    "cost_limit": true,
    "max_call_cost": 0.18,
    "channels_restrict": true,
    "max_channels": 10,
    "rewrite_enabled": true,
    "rewrite_prefix": "00",
    "rewrite_cond": "1",
    "passthrough": false
}
Delete SIP trunk
SIP trunks that are not used anymore can be deleted from your Wavix account.
To delete a SIP trunk from your account, use the following API method:
Request example
DELETE https://api.wavix.com/v1/trunks/1?appid=<YOUR_API_KEY> Call Detail Records (CDRs)
Wavix API allows you to query and export Call Detail Records (CDRs) from your account using various query parameters. CDRs contain different attributes of a specific call, such as time, duration, origination and destination numbers, and price of the call.
CDRs have no retention period on the Wavix platform.
In this section, you will learn how to search for CDRs and get call metrics using Wavix API.
NOTE The Wavix CDR API is available both for Flex and Flex Pro users.
Prerequisites
Firstly, you need to sign up for a Wavix account.
Follow these steps to successfully create a new Wavix account:
- Register your email address at https://app.wavix.com/.
- Check your inbox for an activation email from Wavix.
- Click on the link in the email to activate your account.
After a Wavix sales representative approves your account, you’ll need to choose the Wavix Flex Pro account level and you’ll be granted access to the Wavix CDR API.
The Wavix APIs use API keys for request authentication. To get your API key, log into your Wavix and click on the Profile icon in the top right corner. The API keys can be found in the “API keys” section.
More information on how to authenticate API requests can be found at https://wavix.com/api#/rest/getting-started/authorizing-your-client
Get CDRs
Wavix API allows requesting CDRs as either a CSV file or in JSON format. The format of the response is defined in the request header. The Wavix platform also supports JSON streaming for CDRs.
Using Wavix API you can get in near real-time:
- The detailed record of every inbound, outbound, and missed call.
- Summary information about all your inbound or outbound calls, including total duration, total price, and the number of calls received or placed. This feature is available for JSON response format only.
Depending on your particular use case CDRs can be used to:
- Monitor any disruption of the service.
- Analyze patterns and trends in the usage of the service.
To query CDRs, use the following method:
Request example
GET https://api.wavix.com/v1/cdr?type=placed&from=2021-02-10&to=2021-02-20&per_page=100&appid=<YOUR_API_KEY>Response example
{
  "items": [
    {
      "date": "2021-02-10T10:07:06.376Z",
      "from": 12212123123,
      "to": 18001231233,
      "duration": 72,
      "charge": 0.01,
      "destination": "sip:36465@sip.example.com",
      "sip_trunk": "36465",
      "per_minute": 0.0059,
      "forward_fee": 0.0059
    }
  ],
   "stats": {
    "count": 100,
    "duration": 653,
    "amount": 33.45
  },
  "pagination": {
    "total": 100,
    "total_pages": 10,
    "current_page": 2,
    "per_page": 10
  }
}
SMS and MMS
The Wavix platform allows customers to integrate SMS and MMS capabilities into their services or applications. Using the Wavix Messaging API, customers can send messages, track delivery status, and retrieve detailed message logs. An SMS message can be sent with a numeric or alphanumeric Sender ID registered on the Wavix platform, while MMS can be only sent to the U.S. and Canadian phone numbers only using 10-digit numeric or short code as Sender ID.
NOTE The Wavix Messaging API is available both for Flex and Flex Pro users.
Prerequisites
Firstly, you need to sign up for a Wavix account.
Follow these steps to successfully create a new Wavix account:
- Register your email address at https://app.wavix.com/.
- Check your inbox for an activation email from Wavix.
- Click on the link in the email to activate your account.
After a Wavix sales representative approves your account, you’ll need to choose either Wavix Flex or Wavix Flex Pro account level and you’ll be granted access to the Wavix Messaging API.
The Wavix APIs use API keys for request authentication. To get your API key, log into your Wavix and click on the Profile icon in the top right corner. The API keys can be found in the “API keys” section.
More information on how to authenticate API requests can be found at https://wavix.com/api#/rest/getting-started/authorizing-your-client
The Wavix Messaging API is available to customers with the Flex and Flex Pro account level.
Before sending a message
In SMS messaging, a Sender ID is the message sender details recipients see on their devices. Sender IDs can be numeric, or alphanumeric presenting a brand or a service name. Before sending an SMS message, you need to register a numeric or an alphanumeric Sender ID on the Wavix platform:
- Alphanumeric Sender ID can be up to 11 characters long and contain only both upper- and lower-case ASCII letters, the digits 0 through 9, and spaces.
- Numeric Sender ID is a string of digits associated with one of the SMS-enabled on your account. 3rd party numbers and DIDs that do not support inbound SMS cannot be used as a Sender ID.
Sender ID can be registered either in GUI at https://app.wavix.com or using this API.
How to SMS-enable a DID
To enable SMS for a DID:
- Log in to your Wavix account at https://app.wavix.com.
- In the top menu choose Miscellaneous and then click on Support
- Open a new Support ticket and provide the list of DIDs you want to activate SMS support for.
NOTE Inbound SMS can be enabled on US and Canadian DIDs only. You’ll be notified via email once your request is completed.
How to register a Sender ID using GUI
To register a Sender ID using GUI:
- Log in to your Wavix account at https://app.wavix.com
- In the top menu choose SMS and then click on Sender IDs.
- Complete the Sender ID wizard to provision a Sender ID.
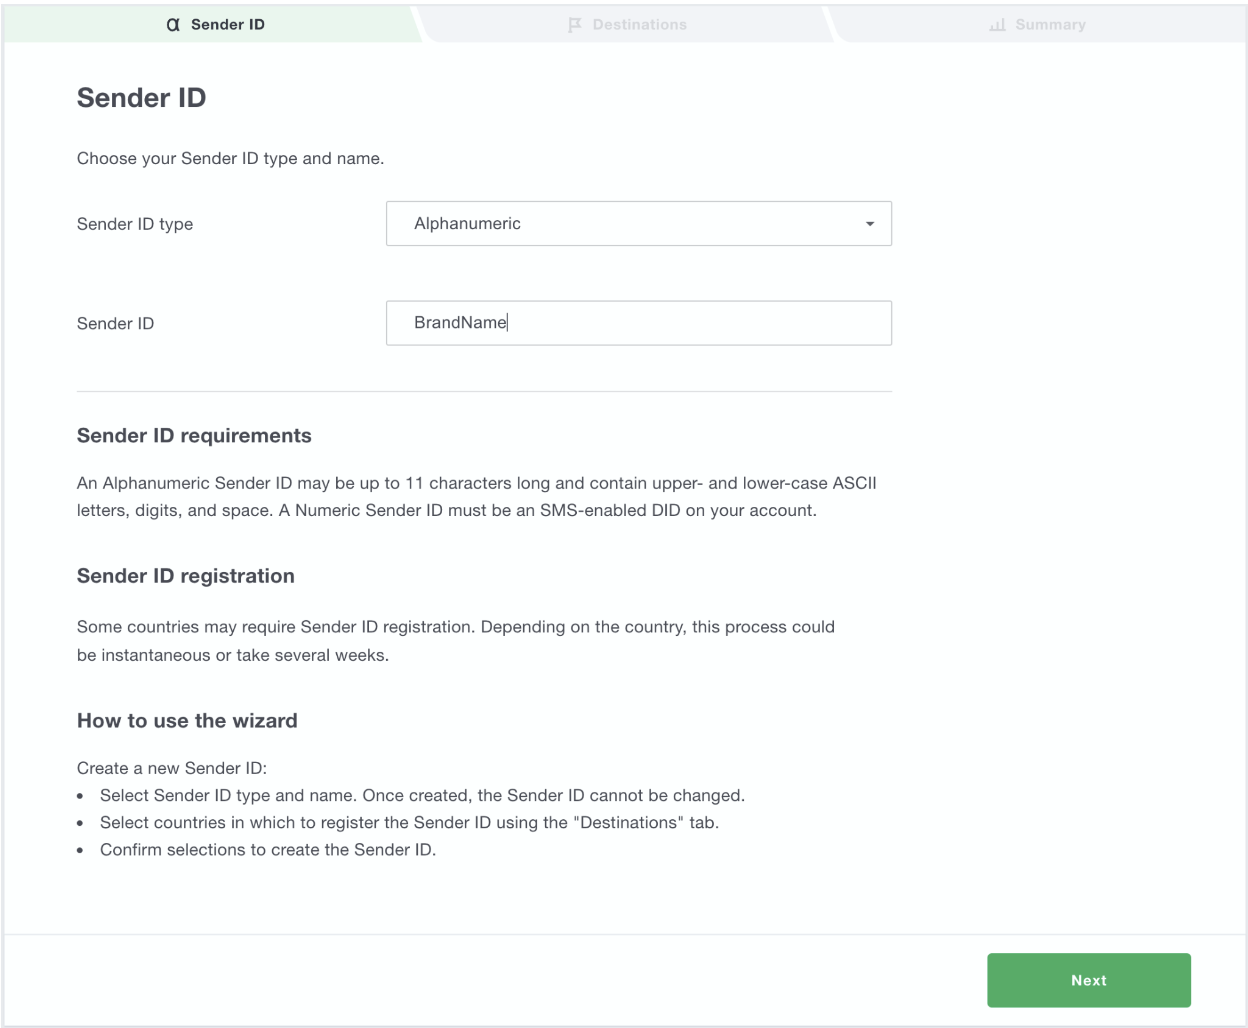
Step I
Complete the following sections:
- Sender ID type, can be alphanumeric or numeric
- Sender ID:
- For Alphanumeric Sender ID type specify the name that you want to use, e.g. BrandName
- For Numeric Sender ID type choose one of SMS-enabled DIDs on your account. If you do not see the number that you want to use in the drop-down menu, check if it’s actually SMS-enabled.
Then click Next.
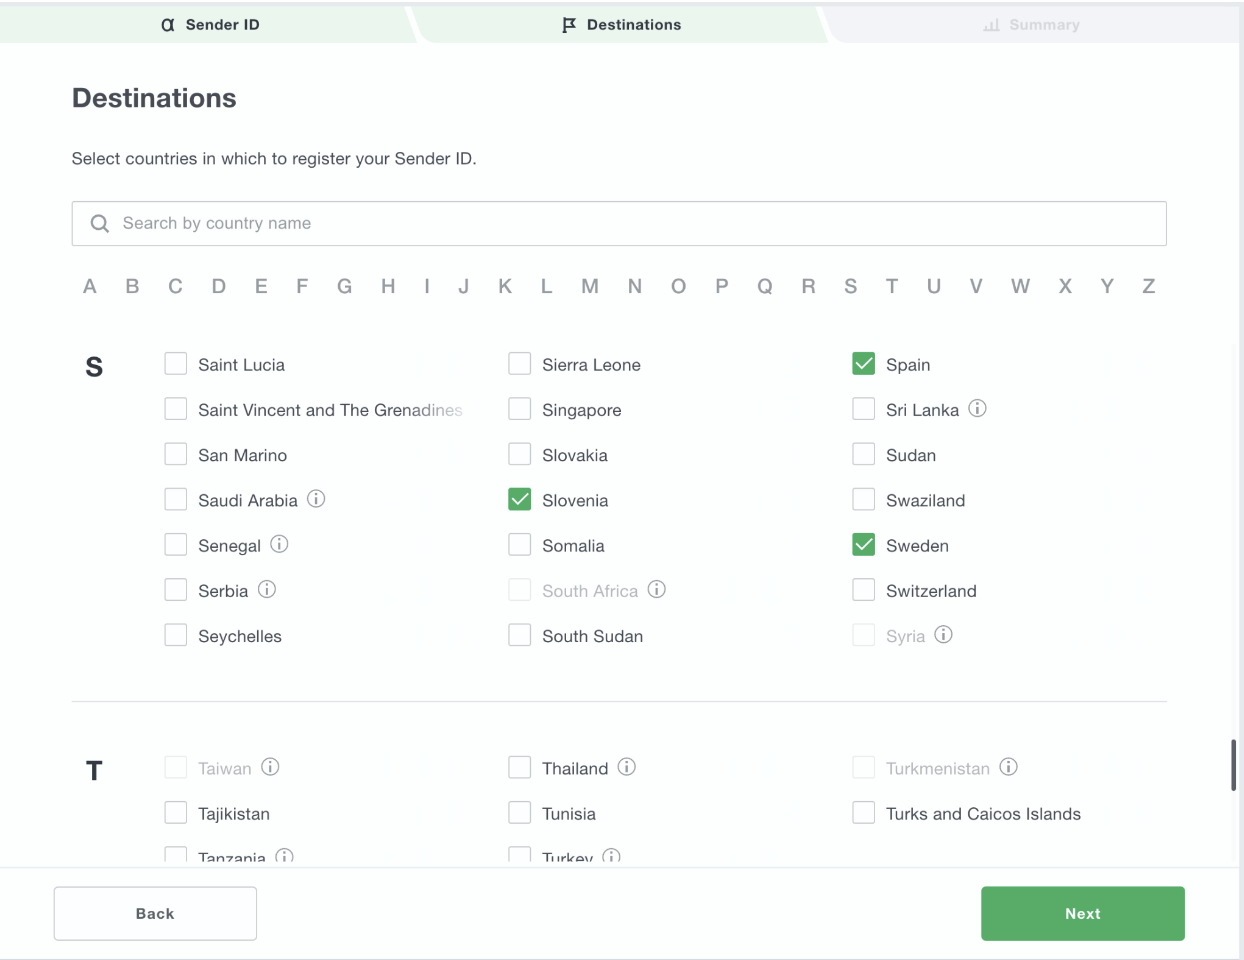
Step II
Complete the following sections:
- Select your destination countries. Please note that Sender ID regulation varies from country to country and depending on the Sender ID type you chose some destinations may be unavailable
Then click Next.
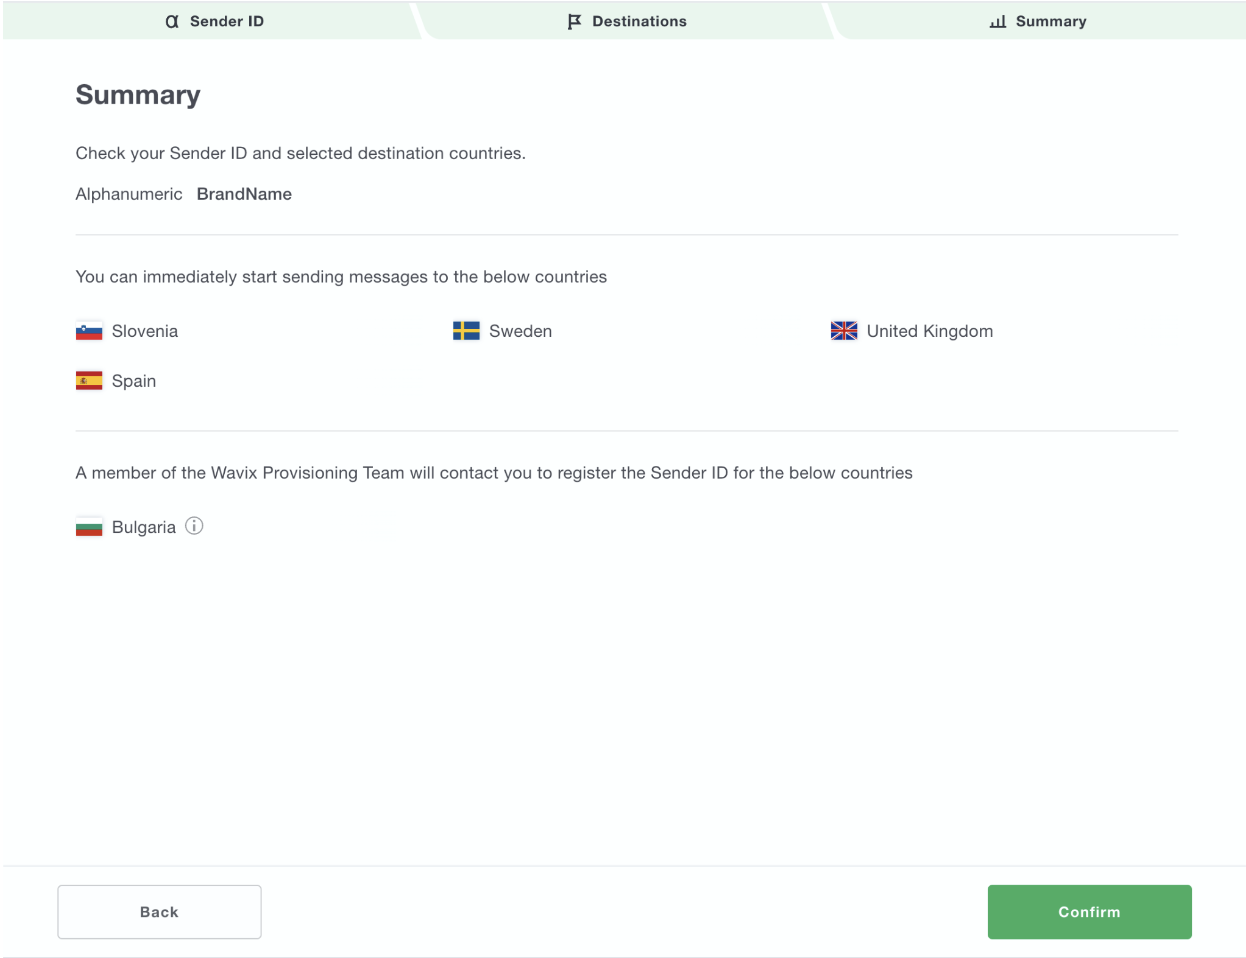
Step III
Review the Sender ID, type and the destination countries. Your Sender ID will be automatically allow listed for countries where no additional paperwork is required. Countries that require manual registration of the Sender ID will be highlighted on the Summary page.
Then click Confirm
You can immediately start sending messages to the countries that do not require manual Sender ID registration.
How to register a Sender ID using API
Since Sender ID regulation vary country by country, the API allows Sender ID registration only in countries where it can be provisioned in self-service mode. To check if a numeric or an alphanumeric Sender ID can be registered in self-service mode in the particular country use the following method:
GET https://api.wavix.com/v2/messages/sender_ids/restrictions?country={country_code}&type={sender_type}
- "country_code" – 2 letter ISO code of the country
- "sender_type" – Sender ID type, can be either numeric or alphanumeric All parameters are mandatory and cannot be blank.
If successful, the method returns an “HTTP 200 OK” status code. The response body will indicate if a numeric or an alphanumeric Sender ID can be registered in self-service mode in the country.
{
    "self_service": true
}
If self_service is “true” the Sender ID can be registered using this API. Otherwise, the Sender ID needs to be created using GUI at https://app.wavix.com and go through the review or registration procedure.
To register a new Sender ID use the following method:
Paste the following JSON in the request body
    {
        "sender_id": "1313xxxxxxx",
        "countries": [
            "US"
        ],
        "type": "numeric"
}- "sender_id" - name of the Sender ID
- "countries" - an array of countries the Sender ID needs to be registered in
- "type" - Sender ID type
If successful, the method returns an “HTTP 200 OK” status code. The response body will contain the Sender ID details.
{
   "id": "94b319e0-8277-4efa-b7ec-d6e0e255ddaf",
   "allowlisted_in": [
       "US"
   ],
   "sender_id": "1313xxxxxxx",
   "type": "numeric"
}- "id" - system-generated unique ID of the Sender ID
- "allowlisted_in" - an array of countries the Sender ID is automatically provisioned
- "sender_id" - name of the Sender ID
- "type" - Sender ID type
To get a list of Sender IDs on your account use the following method. The method does not require any parameters.
If successful, the method returns “HTTP 200 OK” status code. The response body will contain an array of Sender IDs provisioned on the account and their details.
{
   "items": [
       {
           "id": "5108c63f-af4d-4852-88e0-ce06e82db5d3",
           "allowlisted_in": [
               "GB",
               "FR"
           ],
           "sender_id": "Wavix",
           "type": "alphanumeric"
       },
       {
           "id": "94b319e0-8277-4efa-b7ec-d6e0e255ddaf",
           "allowlisted_in": [
               "US",
               "CA"
           ],
           "sender_id": "1313xxxxxxx",
           "type": "numeric"
       }
   ]
}- "id" - unique ID of Sender ID
- "allowlisted_in" - an array of countries the Sender ID is automatically provisioned
- "sender_id" - name of the Sender ID
- "type" - Sender ID type
To delete a Sender ID from your account use the following method:
- "id" - unique ID of Sender ID
If successful, the method returns “HTTP 204 No content” status code without the response body.
How to send a message
To send an SMS or MMS message use the following method:
Paste the following JSON in the request body:
{
   "from": "SenderID",
   "to": "1686xxxxxxx",
   "message_body": {
       "text": "Message text.",
       "media": ["https://publicly-available-resource.com/media"]
   }
}- "from" - the Sender ID to be used to send an SMS, must be a registered Sender ID on your account.
- "to" - a subscriber to send the message to, must be a properly formatted phone number in E.164 format.
- "message_body.text" - the text of the SMS message to be sent.
- "message_body.media" - an array of URLs to media files to be included the message attachments . In case the parameter is specified and its value different from
null, the message will be sent as MMS. The URLs must point to a publicly available resources.
All the parameters are mandatory and cannot be left blank.
If successful, the service returns a “HTTP 201 Created” status code. The response body will contain sent message details.
Response example
{
  "message_id": "871b4eeb-f798-4105-be23-32df9e991456",
  "message_type": "mms",
  "from": "13137890021",
  "to": "13137890021",
  "mcc": "301",
  "mnc": "204",
  "message_body": {
    "text": "This is an MT message",
    "media": ["https://publicly-available-resource.com"]
  },
  "tag": null,
  "status": "accepted",
  "segments": 1,
  "charge": "0.02",
  "submitted_at": "2022-04-14T13:51:16.096Z",
  "sent_at": null,
  "delivered_at": null,
  "error_message": null
}
How to get the message details
To get the delivery status and details of the message submitted to the Wavix platform, use the following method:
- “message_id” - the unique identifier of the message on the Wavix platform for which the details are requested.
If successful, the service returns a “HTTP 200 OK” status code. The response body will contain the message details.
Response example
{
  "message": {
    "direction": "outbound",
    "message_id": "871b4eeb-f798-4105-be23-32df9e991456",
    "message_type": "mms",
    "from": "13137890021",
    "to": "13137890021",
    "mcc": "301",
    "mnc": "204",
    "message_body": {
      "text": "This is an MT message",
      "media": ["https://publicly-available-resource.com"]
    },
    "tag": "1234",
    "status": "delivered",
    "segments": 1,
    "charge": "0.02",
    "submitted_at": "2022-04-14T13:51:16.096Z",
    "sent_at": "2022-04-14T13:51:16.096Z",
    "delivered_at": "2022-04-14T13:51:16.096Z",
    "error_message": null
  }
}
For outbound messages the status attribute indicates the delivery status of the message. The full list of possible delivery statuses can be found here .
How to unsubscribe a recipient
In the case you need to unsubscribe a recipient from receiving SMS or MMS messages, use the following method:
Paste the following JSON in the request body:
{
   "sender_id": "1716xxxxxxx",
   "phone_number": "1686xxxxxxx"
}- "sender_id" - Sender ID of which the phone number will be opted out. If not specified, the phone number will be opted out of all SMS messages.
- "phone_number" - the phone number to be opted out
If successful, the service returns a “HTTP 204 Created” status code.
Campaign builder
The Wavix's Visual Campaign builder allows you to create custom scenarios for outbound calls using an intuitive, drag-and-drop user interface. Using the Wavix Campaign builder API customers can trigger automatic calls that are programmed to follow a specific scenario.
NOTE The Wavix Campaign builder API is only available exclusively for Flex Pro users.
Prerequisites
Firstly, you need to sign up for a Wavix account.
Follow these steps to successfully create a new Wavix account:
- Register your email address at https://app.wavix.com/.
- Check your inbox for an activation email from Wavix.
- Click on the link in the email to activate your account.
After a Wavix sales representative approves your account, you’ll need to choose the Wavix Flex Pro account level and you’ll be granted access to the Wavix Campaign builder API.
The Wavix APIs use API keys for request authentication. To get your API key, log into your Wavix and click on the Profile icon in the top right corner. The API keys can be found in the “API keys” section.
More information on how to authenticate API requests can be found at https://wavix.com/api#/rest/getting-started/authorizing-your-client
The Wavix Campaign builder API is only available for accounts with Flex Pro account level.
How to launch a campaign
Before placing an automatic call, you need to log in to your Wavix account and create a Call Flow using the GUI available at https://app.wavix.com/calling/flows. Once the Call Flow is approved, it can be used with the Wavix Campaign Builder API.
In order to launch a call you need to get the unique identifier on the Call Flow. To get the ID, follow the below steps:
- Navigate to https://app.wavix.com/calling/flows
- Double-click to view the approved Call Flow you’re planning to launch
- Check your browser address string. The address will contain the following URL https://app.wavix.com/calling/flows/view/{ID} where {ID} is the unique identifier of the Call Flow
To trigger a call, use the following method:
Send the following JSON in the request body:
{
    "voice_campaign": {
        "callflow_id": callflow_id,
        "contact": "contact",
        "caller_id": "caller_id"
    }
}- "callflow_id" – the unique identifier on the Call Flow to be launched
- "contact" – a phone number to place an outbound call to. Must be an E.164 formatted phone number, with or without the leading “+”
- "caller_id" – an active phone number on your Wavix account. The number will be used as the Caller ID
All parameters are mandatory and cannot be blank.
If successful, the service returns an “HTTP 201 Created” status code. The response body will contain the placed call details.
{
   "voice_campaign": {
       "id": 1,
       "caller_id": "4420xxxxxxxx",
       "contact": "4477xxxxxxxx",
       "status": "in_progress",
       "timestamp": "2021-12-09T09:47:18Z"
   }
}
Once the triggered call is completed, you can query its details using the Wavix CDR API.
E911 API
The Wavix E911 API allows registering an emergency address for the US and Canadian phone numbers on the Wavix platform.
Follow these steps to activate the E911 service on your Wavix phone number: Validate an emergency service address Associate an emergency service address to a phone number on your Wavix account
NOTE The Wavix E911 API is only available exclusively for Flex Pro users.
Prerequisites
Before you can create, validate and associate an emergency service address with phone numbers, you need to sign up for Wavix.
Follow these steps to successfully create a new account:
- Register your email address at https://wavix.com.
- Check your inbox for an activation email from Wavix.
- Click on the link in the email to activate your account.
After a Wavix sales representative approves your account, you’ll need to choose the Wavix Flex Pro account level and you’ll be granted access to the Wavix E911 API.
The Wavix API uses API keys for request authentication. More information on how to authenticate API requests can be found at https://wavix.com/api#/rest/getting-started/authorizing-your-client
How to validate emergency service address
Before activating emergency calling on a specific phone number you need to validate the emergency service address using the method below.
Paste the following JSON in the request body:
{
   "phone_number": "18778230012",
   "name": "Headquarters",
   "address": {
       "street_number": "12",
       "street": "Michigan Ave",
       "location": "Lobby",
       "city": "Chicago",
       "state": "IL",
       "zip_code": "60600"
   }
}- phone_number - a phone number that will be associated with the address. Must be either a geographical (e.g. 16467571010) or a toll-free phone number on your Wavix account
- name - the name for the E911 service address
- address - detailed information about E911 address to be validated:
- street_number - the street number
- street - the street address
- location - any additional information required to identify the in-building location, i.e. suite, floor, room, etc.
- city - the city
- state - two-letter abbreviated US state or Canadian province or territory the city is located
- zip_code - a valid US or CA postal code for the E911 address
All parameters, except location and name, are mandatory and cannot be blank.
Response example
If successful, the method returns an “HTTP 200 OK” status code. The response will include address validation status that can be one of the following:
- Full match. The submitted address is valid and can be added to the PSAP database.
- Address corrected. The status means the submitted address contained minor errors or typos that were automatically corrected. The corrected address can be added to the PSAP database.
- Candidate addresses returned. The status indicates that the submitted address is not close enough to find a match, or may contain errors, i.e. missing or invalid street address or zip code. The Wavix platform was not able to automatically correct those errors.
- No match
{
   "status": 2,
   "phone_number": "18778230012",
   "corrected_address": {
       "street_number": "12",
       "street": "Michigan Ave",
       "location": "Lobby",
       "city": "Chicago",
       "state": "IL",
       "zip_code": "60603"
       "zip_plus_four": "606031234"
   }
}
The ‘no match’ status in the response indicates that the submitted address cannot be registered as an emergency address.
NOTE In cases where the
statusattribute of the response indicates that the submitted address was corrected or a list of candidates was returned, you need to carefully check the suggested addresses and, if they match your real address, choose one of them. Otherwise, you need to adjust the initial address and resubmit the request.
How to associate an emergency service address with a phone number
After validating an emergency address, it can be associated with a phone number on your Wavix account using the method below:
Paste the following JSON in the request body
{
   "phone_number": "18778230012",
   "name": "Headquarters",
   "address": {
       "street_number": "12",
       "street": "Michigan Ave",
       "location": "Lobby",
       "city": "Chicago",
       "state": "IL",
       "zip_code": "60603",
       "zip_plus_four": "606031234"
   }
}- phone_number - a phone number that will be associated with the address. Must be either a geographical (e.g. 16467571010) or a toll-free phone number on your Wavix account
- name - the name of the E911 service address
- address - detailed information about the E911 address:
- street_number - the street number
- street - the street address
- location - any additional information required to identify the in-building location, i.e. suite, floor, room, etc.
- city - the city
- state - two-letter abbreviated US state or Canadian province or territory the city is located
- zip_code - a valid US or CA postal code of E911 address
- zip_plus_four - the E911 address zip plus four code
All parameters are mandatory and cannot be blank.
How to list E911-enabled phone numbers on your account
To list E911-enabled phone numbers on your account and the associated emergency service addresses, use the following request:
- phone_number - an optional parameter that can be used to filter results by a specific phone number.
Response example
If successful, the method returns an “HTTP 200 OK” status code. The response contains a list of E911-enabled phone numbers and associated address details
 {
   "items": [
       {
           "phone_number": "18778230012",
           "name": "Headquarters",
           "address": {
               "street_number": "12",
               "street": "Michigan Ave",
               "location": "Lobby",
               "city": "Chicago",
               "state": "IL",
               "zip_code": "60603",
               "zip_plus_four": "606031234"
           }
       }
   ]
}
How to delete the E911 record for a specific phone number
Deleting E911 record for a phone number means that the emergency calling service will be automatically deactivated for this phone number. To delete an E911 record for a specific phone number, use the following method:
- phone_number - mandatory parameter, a phone number to deactivate the service for
Response example
If successful, the method returns an empty response with the “HTTP 204 No content” status code.
Number Validator
The Wavix Number Validator API allows customers to automate phone number validation process by checking the phone number validity, reachability, and roaming status. Using the API Wavix customers can also get the name of the current carrier of the phone number, check if it was ported, and more.
All phone numbers are validated using the latest international numbering plan databases.
Based on your specific business needs, you can get detailed information about either a single phone number or several numbers with one request. You can also choose one of three validation request types: “format”, “analysis”, or “validation”.
The table below shows phone number details returned depending on the request type.
| Parameter | format | analysis | validation |
|---|---|---|---|
| Phone number validity | + | + | + |
| Local formatiing | + | + | + |
| Phone number country | + | + | + |
| E.164 formatiing | + | + | + |
| MCC, MNC for mobile phone numbers | + | + | |
| Type (mobile/toll-free/etc.) | + | + | |
| Current carrier | + | + | |
| Ported status | + | + | |
| Unallocated range | + | + | |
| Risky destination | + | ||
| Timezone | + | ||
| Reachability* | + | ||
| Roaming status* | + |
*Reachability and roaming statuses are returned for mobile phone numbers only. The feature is available in selected countries only. Please contact your account manager for more details.
NOTE The Wavix Number validator API is available exclusively for Flex Pro users.
Prerequisites
Before making your first Number validator request, you must sign up for a Wavix account.
Follow these steps to create a new Wavix account:
- Register your email address at https://wavix.com.
- Check your inbox for an activation email from Wavix.
- Click on the link in the email to activate your account.
After a Wavix sales representative approves your account, you’ll need to choose Wavix Flex Pro account level and you’ll be granted access to the Wavix Number Validator API.
The Wavix API uses API keys for request authentication. More information on how to authenticate API requests can be found at https://wavix.com/api#/rest/getting-started/authorizing-your-client
How to validate a single phone number
To get detailed information about a single phone number, use the following method:
Pass the following parameters in the request URL:
- number - the phone number to be validated.
- validation_type - the Wavix Number validator request type: “format”, “analysis”, or “validation”.
All parameters are mandatory and cannot be blank.
Response example
If successful, the method returns an “HTTP 200 OK”. The response body will contain information about the phone number.
{
   "phone_number": "628xxxxxx000",
   "is_valid": true,
   "country_code": "ID",
   "e164_format": "+628xxxxxx000",
   "national_format": "08xx-xxxx-000",
   "ported": false,
   "mcc": "510",
   "mnc": "10",
   "phone_type": "mobile",
   "carrier_name": "PT. Telekomunikasi Selular",
   "risky_destination": false,
   "unallocated_range": false,
   "reachable": true,
   "roaming": false,
   "timezone": "UTC+07:00",
   "cost": "0.015",
   "error_code": "000"
}
How to validate several phone numbers
The Wavix Number Validator API allows you to get detailed information about several phone numbers with a single request.
Under most circumstances, it takes about 30 seconds to validate a batch of 1,000 phone numbers. We recommend you use async:true if you're planning to validate more than 1,000
Paste the following JSON in the request body:
{
   "async": false/true,
   "type": "validation_type",
   "phone_numbers": ["number1", "number2", "number3", ...]
}- async - indicates whether the request must be executed asynchronously.
- type - the Wavix Number validator request type. Could be either “format”, “analysis”, or “validation”.
- phone_numbers - an array of strings, each string contains a single phone number to validate.
All parameters are mandatory and cannot be blank.
Response example
For synchronous requests, if successful, the method returns the “HTTP 200 OK” status code. The response contains detailed information about each phone number.
{
    "status": "success",
    "pending": 0,
    "items": [
        {
            "phone_number": "628xxxxxx000",
            "is_valid": true,
            "country_code": "ID",
            "e164_format": "+628xxxxxx000",
            "national_format": "08xx-xxxx-000",
            "ported": false,
            "mcc": "510",
            "mnc": "10",
            "phone_type": "mobile",
            "carrier_name": "PT. Telekomunikasi Selular",
            "risky_destination": false,
            "unallocated_range": false,
            "reachable": true,
            "roaming": false,
            "timezone": "UTC+07:00",
            "cost": "0.015",
            "error_code": "000"
        },
        {
            "phone_number": "628xxxxxx000",
            "is_valid": true,
            "country_code": "ID",
            "e164_format": "+628xxxxxx000",
            "national_format": "08xx-xxxx-000",
            "ported": false,
            "mcc": "510",
            "mnc": "10",
            "phone_type": "mobile",
            "carrier_name": "PT. Telekomunikasi Selular",
            "risky_destination": false,
            "unallocated_range": false,
            "reachable": true,
            "roaming": false,
            "timezone": "UTC+07:00",
            "cost": "0.015",
            "error_code": "000"
        }
For asynchronous requests, if successful, the method returns the “HTTP 201 Created” status code which the validation process has started. The response contains a token that needs to be used to poll the results.
{
  "request_uuid": "12542c5c-1a17-4d12-a163-5b68543e75f6"
}
To poll asynchronous validation results, use the following method:
If successful, the response will contain detailed information about the phone numbers that have already been validated and status of the asynchronous validation.
{
    "status": "progress",
    "count": 4,
    "pending": 2,
    "items": [
        {
            "phone_number": "628xxxxxx000",
            "is_valid": true,
            "country_code": "ID",
            "e164_format": "+628xxxxxx000",
            "national_format": "08xx-xxxx-000",
            "ported": false,
            "mcc": "510",
            "mnc": "10",
            "phone_type": "mobile",
            "carrier_name": "PT. Telekomunikasi Selular",
            "risky_destination": false,
            "unallocated_range": false,
            "reachable": true,
            "roaming": false,
            "timezone": "UTC+07:00",
            "cost": "0.015",
            "error_code": "000"
        },
        {
            "phone_number": "628xxxxxx000",
            "is_valid": true,
            "country_code": "ID",
            "e164_format": "+628xxxxxx000",
            "national_format": "08xx-xxxx-000",
            "ported": false,
            "mcc": "510",
            "mnc": "10",
            "phone_type": "mobile",
            "carrier_name": "PT. Telekomunikasi Selular",
            "risky_destination": false,
            "unallocated_range": false,
            "reachable": true,
            "roaming": false,
            "timezone": "UTC+07:00",
            "cost": "0.015",
            "error_code": "000"
        }
    ]
}
Speech Analytics API
The Wavix Speech Analytics API allows you to search for keywords and phrases in all call transcriptions or query a specific call transcription. Additionally, you can use the API to programmatically submit a specific recorded call for transcription.
NOTE The Wavix Speech Analytics API is only available exclusively for Flex Pro users.
To search for call transcriptions containing particular keywords or phrases you must enable Call recording and Call transcription services on the respective SIP trunks and phone numbers. You can do it using GUI or you can also activate the service using the Wavix SIP trunks and DIDs APIs.
Prerequisites
Before you can access the Wavix Speech Analytics API, you need to sign up for Wavix.
Follow these steps to successfully create a new account:
- Register your email address at https://wavix.com.
- Check your inbox for an activation email from Wavix.
- Click on the link in the email to activate your account.
After a Wavix sales representative approves your account, you’ll need to choose the Wavix Flex Pro account level and you’ll be granted access to the Wavix Speech Analytics API. The Wavix API uses API keys for request authentication. More information on how to authenticate API requests can be found at https://wavix.com/api#/rest/getting-started/authorizing-your-client
How Wavix Call transcription works
When you activate the service on a SIP trunk or a phone number, Wavix automatically converts recorded calls into the plain text format. Depending on the length of the call and the number of other recordings in the queue, it may take different time for the transcription to be completed. Typically, the majority of calls are transcribed within 10 minutes.
After the call is transcribed, Wavix automatically determines the language of the call and labels speakers as an agent and a client based on the call direction.
Request transcription for a specific call
To request transcription for a specific call, use the method below:
- uuid - mandatory parameter. The unique identifier of the call.
Response example
If successful, the method returns an “HTTP 200 OK” status code. The response will contain the full transcription of the recorded call. The transcription will be divided into blocks of text attributed to one of the speakers. Every block of text includes the start and end time when it was said. The time is provided in milliseconds and calculated from the moment the call was answered.
{
   "transcript": {
       "19293741161": "Hello",
       "19293741160": "Hi"
   },
   "turns": [
       {
           "phone_number": "19293741161",
           "s": 600,
           "e": 700,
           "text": "Hi"
       }
   ],
   "uuid": "1234",
   "language": "en",
   "duration": 10,
   "charge": "0.003",
   "status": "completed",
   "transcription_date": "2023-01-09T10:04:39.734Z"
}
Search for calls containing keywords or phrases
To search for calls with transcription containing specific keywords or phrases, use the following method:
Paste the following JSON in the request body:
{
   "type": "placed",
   "from": "2023-01-01",
   "to": "2023-01-31",
   "transcription": {
       "status": "completed",
       "language": "en",
       "agent": {
           "must": [
               "Hello",
               "Thank you"
           ],
           "match": [
               "Nope",
               "Maybe"
           ],
           "exclude": [
               "Richard",
               "Issue resolved"
           ]
       },
       "client": {
           "must": [
               "Hello",
               "Bye, Larry"
           ],
           "match": [
               "Nope",
               "Maybe"
           ],
           "exclude": [
               "Richard",
               "Issue resolved"
           ]
       },
       "any": {
           "must": [
               "Hello",
               "Bye, Larry"
           ],
           "match": [
               "Nope",
               "Maybe"
           ],
           "exclude": [
               "Richard",
               "Issue resolved"
           ]
       }
   }
}- type - use
placedfor outbound calls orreceivedfor inbound calls - from - filter results by the lower limit on the date the call was placed or received
- to - filter results by the upper limit on the date the call was placed or received
- transcription - filter results by the call transcription parameters:
- status - filter results by transcription status
- language - filter results by the language of the call
- agent - filter results based on keywords and phrases said by a speaker labeled as
agent- must - use
mustto find calls with transcription that includes all of the specified keywords and phrases. The keywords and phrases are combined using logical AND. - match - use
matchto find calls with transcription that includes any of the specified keywords and phrases. The keywords and phrases are combined using logical OR. - exclude - use
excludeto find calls with transcription that do not include any of the specified keywords and phrases. The keywords and phrases are combined using logical OR.
- must - use
- client - filter results based on keywords and phrases said by a speaker labeled as
client- must - use
mustto find calls with transcription that includes all of the specified keywords and phrases. The keywords and phrases are combined using logical AND. - match - use
matchto find calls with transcription that includes any of the specified keywords and phrases. The keywords and phrases are combined using logical OR. - exclude - use
excludeto find calls with transcription that do not include any of the specified keywords and phrases. The keywords and phrases are combined using logical OR.
- must - use
- any - filter results based on keywords and phrases said by any speaker
- must - use
mustto find calls with transcription that includes all of the specified keywords and phrases. The keywords and phrases are combined using logical AND. - match - use
matchto find calls with transcription that includes any of the specified keywords and phrases. The keywords and phrases are combined using logical OR. - exclude - use
excludeto find calls with transcription that do not include any of the specified keywords and phrases. The keywords and phrases are combined using logical OR.
- must - use
The type, from, and to are mandatory parameters and cannot be blank. All other parameters are optional.
Response example
If successful, the method returns an “HTTP 200 OK” status code. The response will contain a list of call detail records that match the search criteria. Every call detail record contains the unique identifier of the call and a link to the full call transcription.
{
    "items": [
        {
            "uuid": "8891",
            "date": "2022-03-03T13:53:59.000Z",
            "from": "12212123123",
            "to": "18001231233",
            "duration": 72,
            "charge": "0.01",
            "disposition": "ANSWERED",
            "transcription": {
                "uuid": "1234",
                "url": "https://api.wavix.com/v1/cdr/8891/transcription?appid=secret"
            },
            "destination": "United States",
            "sip_trunk": "36465",
            "per_minute": "0.0059"
        }
    ],
    "pagination": {
        "total": 100,
        "total_pages": 10,
        "current_page": 2,
        "per_page": 0
    }
}
How to transcribe a single call
To transcribe a single call, use the method below. It may take some time for a call recording to be transcribed, depending on the call length and recordings pending the transcription. Wavix recommends specifying the webhook_url parameter in the request body to be notified when the transcription is completed.
- uuid - mandatory parameter. The unique identifier of the call.
Paste the following JSON in the request body:
{
   "language": "en",
   "webhook_url": "https://you-webhook.url"
}- language - force the language selection for call transcription. Wavix will use the specified language instead of the one detected automatically. Optional parameter.
- webhook_url - a webhook URL to send the transcription status updates to. Optional parameter.
Response example
If successful, the method returns an empty response with the “HTTP 200 OK” status code. Once the transcription is completed you’ll receive a POST callback to the provided webhook address:
{
   "uuid": "123",
   "status": "completed"
}- uuid - the unique identifier of the recorded call
- status - status of the operation. Can be either
completedmeaning the recorded call was successfully transcribed orfailedwhich means that there was an error while transcribing the call.
Environments
This API has support for multiple environments. Each environment has one or more base URIs defined.
Production
| Server | Base URI |
|---|---|
default | https://api.wavix.com/v1/ |
Messaging | https://api.wavix.com/v2/ |
The default environment is production and the default server is default.
Authorizing your client
This API uses the following query parameters for authentication.
| Query | Default | Description |
|---|---|---|
appid | None | API key to authenticate requests |
The request looks like this:
curl {BASEURI}?appid={APPID}GET /?appid={APPID} HTTP/1.1
Host: {HOST}